DevOps Project: Continuous Integration Using Jenkins, Nexus, Sonarqube & Slack


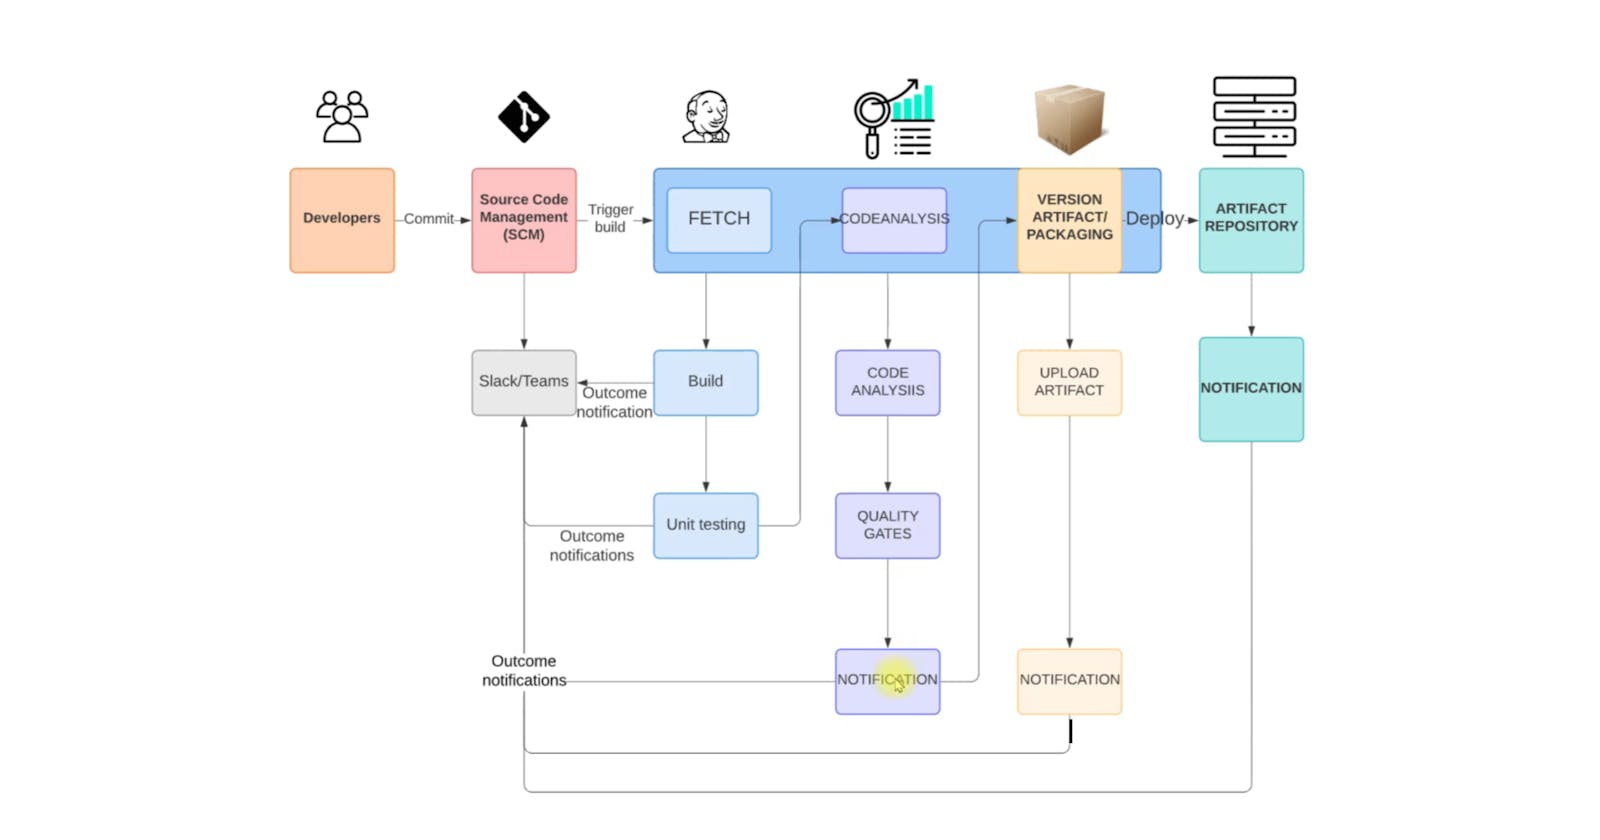
Table of contents
- Why do we need a CI ?
- Tools That We'll Be Using In The Project:
- Step 1: Generate a New Key-Pairs
- Step 2: Create Security Groups for Jenkins, SonarQube, Nexus
- Step 3: Create EC2 Instances for Jenkins, SonarQube, Nexus
- Step 4: Post Installation for Jenkins, SonarQube, Nexus
- Jenkins Setup:
- Nexus Setup:
- SonarQube Setup:
- Git Code Migration:
- Setting up Jenkins pipelines, adding tools like Maven and JDK, managing credentials, and writing pipeline scripts
- Sonar Quality Gates:
- Slack Notification:
Why do we need a CI ?
Faster Bug Fixes: Problems are detected and fixed immediately, shortening mean time to repair (MTTR).
Early Bug Detection: Bugs are caught early in the development process, preventing their accumulation.
Automation and Time Savings: Builds, tests, and deployments are automated, saving time and reducing manual intervention.
Improved Collaboration: CI fosters collaboration among team members and encourages shared responsibility.
Quicker Time-to-Market: Features and updates reach users faster, responding swiftly to market demands.
Better Code Quality: Standards are enforced, tests are automated, and code reviews are conducted, ensuring higher quality code.
Reduced Risk: CI lowers the risk of introducing defects and regressions, minimizing downtime and customer dissatisfaction.
Tools That We'll Be Using In The Project:
Jenkins: The main continuous integration server that orchestrates the entire pipeline.
Git and GitHub: Version control system and remote repository for storing your Java code.
Maven: Build tool for compiling and packaging your Java code.
Checkstyle: Code analysis tool for enforcing coding standards and identifying potential issues.
Slack and Email Integration: Notification channels for informing team members about build and deployment status.
Nexus Repository Manager: Software repository for storing artifacts and managing dependencies for Maven.
SonarQube: Code quality management platform for static code analysis, including tools like the SonarQube Scanner.
Amazon EC2 Instances: Cloud infrastructure for hosting Jenkins, SonarQube, and other servers.
Step 1: Generate a New Key-Pairs

Step 2: Create Security Groups for Jenkins, SonarQube, Nexus
To create security groups for Jenkins, SonarQube, and Nexus, you'll typically need to use the interface provided by your cloud service provider (e.g., AWS, Azure, Google Cloud). Here, I'll give you a general idea of how to create security groups using AWS as an example:
Log in to the AWS Management Console.
Navigate to the EC2 Dashboard.
Creating Security Groups:
Jenkins Security Group (Jenkins-SG):
Inbound Rule:
Port 22 (SSH) allowed from your IP.
Port 8080 allowed from any IPv4 address.
Port 8080 allowed from any IPv6 address.
Nexus Security Group (Nexus-SG):
Inbound Rule:
Port 22 (SSH) allowed from your IP.
Port 8081 allowed from your IP.
Port 8081 allowed from the Jenkins Security Group (Jenkins-SG).
SonarQube Security Group (SonarQube-SG):
Inbound Rule:
Port 22 (SSH) allowed from your IP.
Port 9000 allowed from your IP.
Port 80 allowed from your IP.
Port 80 allowed from the Jenkins Security Group (Jenkins-SG).
Step 3: Create EC2 Instances for Jenkins, SonarQube, Nexus
Launching Jenkins Server:
Choose the Ubuntu Server 22 AMI.
Select the instance type as t2.small, ensuring it's free tier eligible.
Use an existing key pair (vprofile-ci-key).
Choose the Jenkins security group.
In the "Advanced details" section, paste the Jenkins setup script into the user data field.
#!/bin/bash sudo apt update sudo apt install openjdk-11-jdk -y sudo apt install maven -y curl -fsSLhttps://pkg.jenkins.io/debian-stable/jenkins.io-2023.key| sudo tee /usr/share/keyrings/jenkins-keyring.asc > /dev/nullecho deb [signed-by=/usr/share/keyrings/jenkins-keyring.asc]https://pkg.jenkins.io/debian-stablebinary/ | sudo tee /etc/apt/sources.list.d/jenkins.list > /dev/nullsudo apt-get updatesudo apt-get install jenkins -yVerify the setup script and launch the instance.
Launching Nexus Server:
Choose the CentOS Stream 9 (x86_64) AMI.
Select the instance type as t2.medium.
Use the same key pair and choose the Nexus security group.
Paste the Nexus setup script into the user data field.
#!/bin/bash yum install java-1.8.0-openjdk.x86_64 wget -y mkdir -p /opt/nexus/ mkdir -p /tmp/nexus/ cd /tmp/nexus/NEXUSURL="https://download.sonatype.com/nexus/3/latest-unix.tar.gz"wget $NEXUSURL -O nexus.tar.gzsleep 10EXTOUT='tar xzvf nexus.tar.gz'NEXUSDIR='echo $EXTOUT | cut -d '/' -f1'sleep 5rm -rf /tmp/nexus/nexus.tar.gzcp -r /tmp/nexus/* /opt/nexus/sleep 5useradd nexuschown -Rnexus.nexus/opt/nexuscat <> /etc/systemd/system/nexus.service [Unit] Description=nexus service After=network.target[Service] Type=forking LimitNOFILE=65536 ExecStart=/opt/nexus/$NEXUSDIR/bin/nexus start ExecStop=/opt/nexus/$NEXUSDIR/bin/nexus stop User=nexus Restart=on-abort[Install] WantedBy=multi-user.targetEOTecho 'run_as_user="nexus"' > /opt/nexus/$NEXUSDIR/bin/nexus.rcsystemctl daemon-reloadsystemctl start nexussystemctl enable nexusVerify the setup script and launch the instance.
Launching SonarQube Server:
Choose the Ubuntu Server 22 AMI.
Select the instance type as t2.medium.
Use the same key pair and select the SonarQube security group.
Paste the SonarQube setup script into the user data field.
#!/bin/bashcp /etc/sysctl.conf /root/sysctl.conf_backupcat < /etc/sysctl.confvm.max_map_count=262144fs.file-max=65536ulimit -n 65536ulimit -u 4096EOTcp /etc/security/limits.conf /root/sec_limit.conf_backupcat < /etc/security/limits.confsonarqube - nofile 65536sonarqube - nproc 409sudo apt-get update -ysudo apt-get install openjdk-11-jdk -ysudo update-alternatives --config javajava -versionsudo apt updatewget -qhttps://www.postgresql.org/media/keys/ACCC4CF8.asc-O - | sudo apt-key add -sudo sh -c 'echo "debhttp://apt.postgresql.org/pub/repos/apt/lsb_release -cs-pgdg main" >> /etc/apt/sources.list.d/pgdg.list'sudo apt install postgresql postgresql-contrib -y#sudo -u postgres psql -c "SELECT version();"sudo systemctl enable postgresql.servicesudo systemctl start postgresql.servicesudo echo "postgres:admin123" | chpasswdrunuser -l postgres -c "createuser sonar"sudo -i -u postgres psql -c "ALTER USER sonar WITH ENCRYPTED PASSWORD 'admin123';"sudo -i -u postgres psql -c "CREATE DATABASE sonarqube OWNER sonar;"sudo -i -u postgres psql -c "GRANT ALL PRIVILEGES ON DATABASE sonarqube to sonar;"sysLoaded: 1%Progress bar: 99.59% temctl restart postgresql#systemctl status -l postgresqlnetstat -tulpena | grep postgressudo mkdir -p /sonarqube/cd /sonarqube/sudo curl -Ohttps://binaries.sonarsource.com/Distribution/sonarqube/sonarqube-8.3.0.34182.zipsudo apt-get install zip -ysudo unzip -osonarqube-8.3.0.34182.zip-d /opt/sudo mv /opt/sonarqube-8.3.0.34182/ /opt/sonarqubesudo groupadd sonarsudo useradd -c "SonarQube - User" -d /opt/sonarqube/ -g sonar sonarsudo chown sonar:sonar /opt/sonarqube/ -Rcp /opt/sonarqube/conf/sonar.properties/root/sonar.properties_backupcat < /opt/sonarqube/conf/sonar.propertiessonar.jdbc.username=sonarsonar.jdbc.password=admin123 sonar.jdbc.url=jdbc:postgresql://localhost/sonarqubesonar.web.host=0.0.0.0sonar.web.port=9000sonar.web.javaAdditionalOpts=-serversonar.search.javaOpts=-Xmx512m -Xms512m -XX:+HeapDumpOnOutOfMemoryErrorsonar.log.level=INFOsonar.path.logs=logsEOTcat < /etc/systemd/system/sonarqube.service[Unit]Description=SonarQube serviceAfter=syslog.targetnetwork.target[Service]Type=forkingExecStart=/opt/sonarqube/bin/linux-x86-64/sonar.shstart ExecStop=/opt/sonarqube/bin/linux-x86-64/sonar.shstopUser=sonarGroup=sonarRestart=alwaysLimitNOFILE=65536LimitNPROC=4096[Install]WantedBy=multi-user.targetEOTsystemctl daemon-reloadsystemctl enable sonarqube.service#systemctl start sonarqube.service#systemctl status -l sonarqube.serviceapt-get install nginx -yrm -rf /etc/nginx/sites-enabled/defaultrm -rf /etc/nginx/sites-available/defaultcat < /etc/nginx/sites-available/sonarqubeserver{listen 80;server_namesonarqube.groophy.in;access_log /var/log/nginx/sonar.access.log;error_log /var/log/nginx/sonar.error.log;proxy_buffers 16 64k;proxy_buffer_size 128k;location / {proxy_passhttp://127.0.0.1:9000;proxy_next_upstream error timeout invalid_header http_500 http_502 http_503 http_504;proxy_redirect off;proxy_set_header Host \$host;proxy_set_header X-Real-IP \$remote_addr;proxy_set_header X-Forwarded-For \$proxy_add_x_forwarded_for;proxy_set_header X-Forwarded-Proto http;}}EOTln -s /etc/nginx/sites-available/sonarqube /etc/nginx/sites-enabled/sonarqube systemctl enable nginx.service#systemctl restart nginx.servicesudo ufw allow 80,9000,9001/tcpecho "System reboot in 30 sec"sleep 30 rebootVerify the setup script and launch the instance.

Step 4: Post Installation for Jenkins, SonarQube, Nexus
Jenkins Setup:
Access Jenkins using the public IP address.
SSH into the Jenkins server and check the status of the Jenkins service.
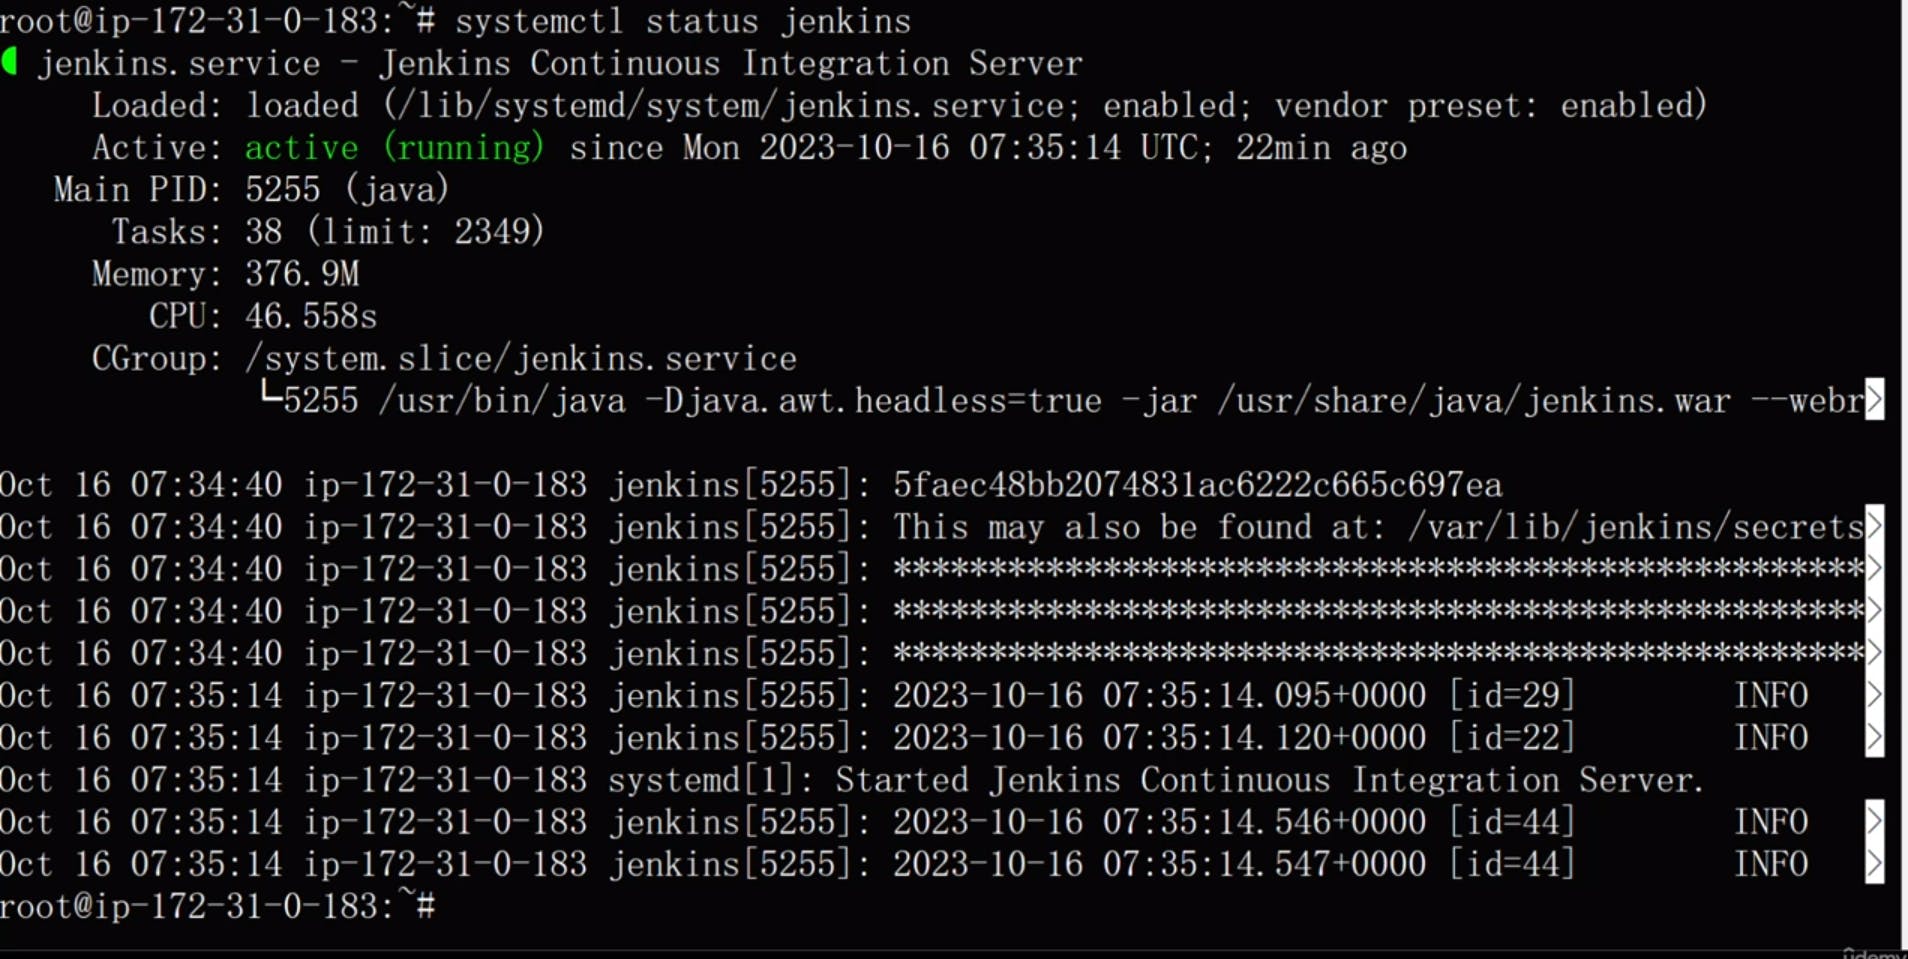
Check the Java version being used by Jenkins.
java --versionExplore the directories where Jenkins and Java are installed.
Path for Jenkins:
/var/lib/jenkins/Path for Java:
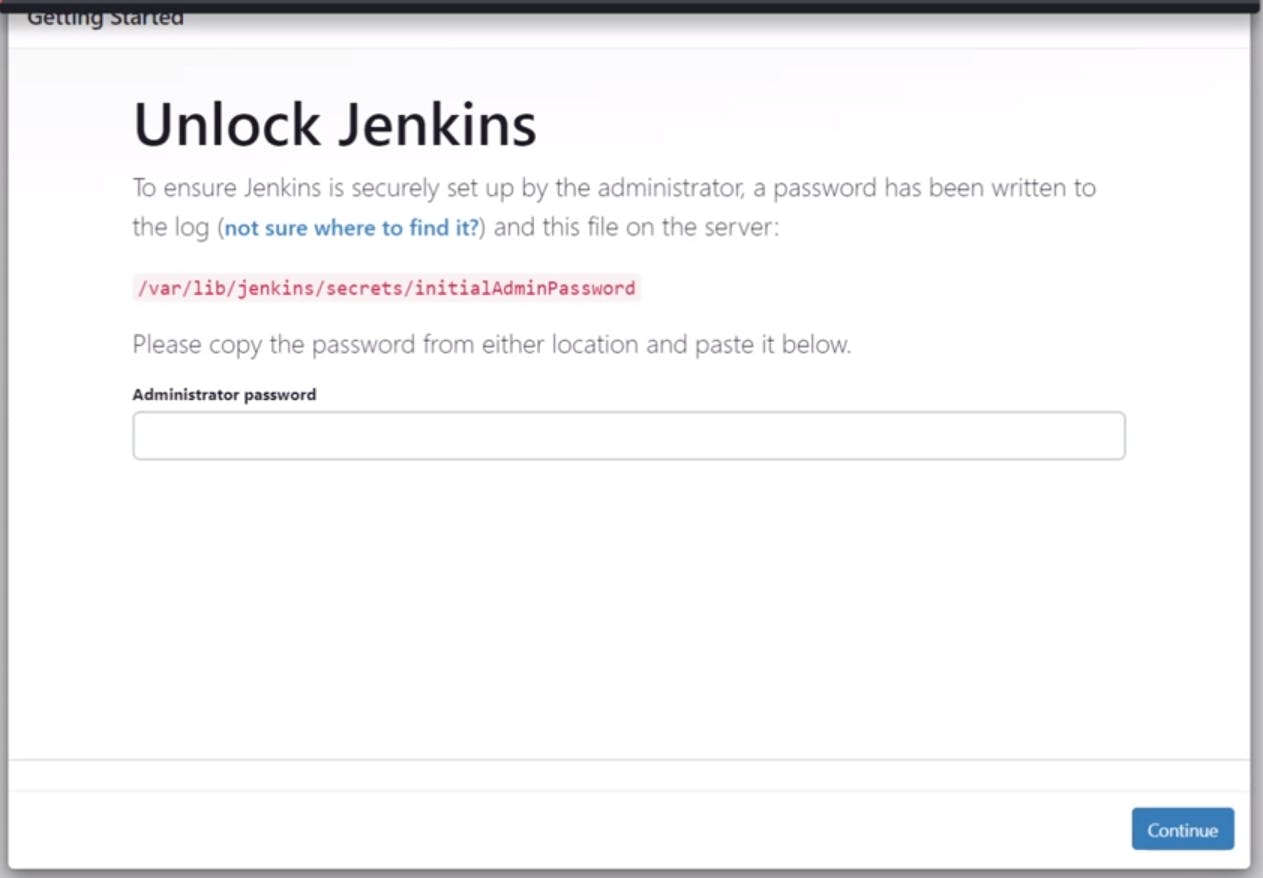
/usr/lib/jvm/Access Jenkins in the browser and complete the initial setup by providing the initial password. From AWS EC2 , select the public ip of Jenkins and then
http://public_ip:8080( Default port for Jenkins )Install the Suggested Plugins and login
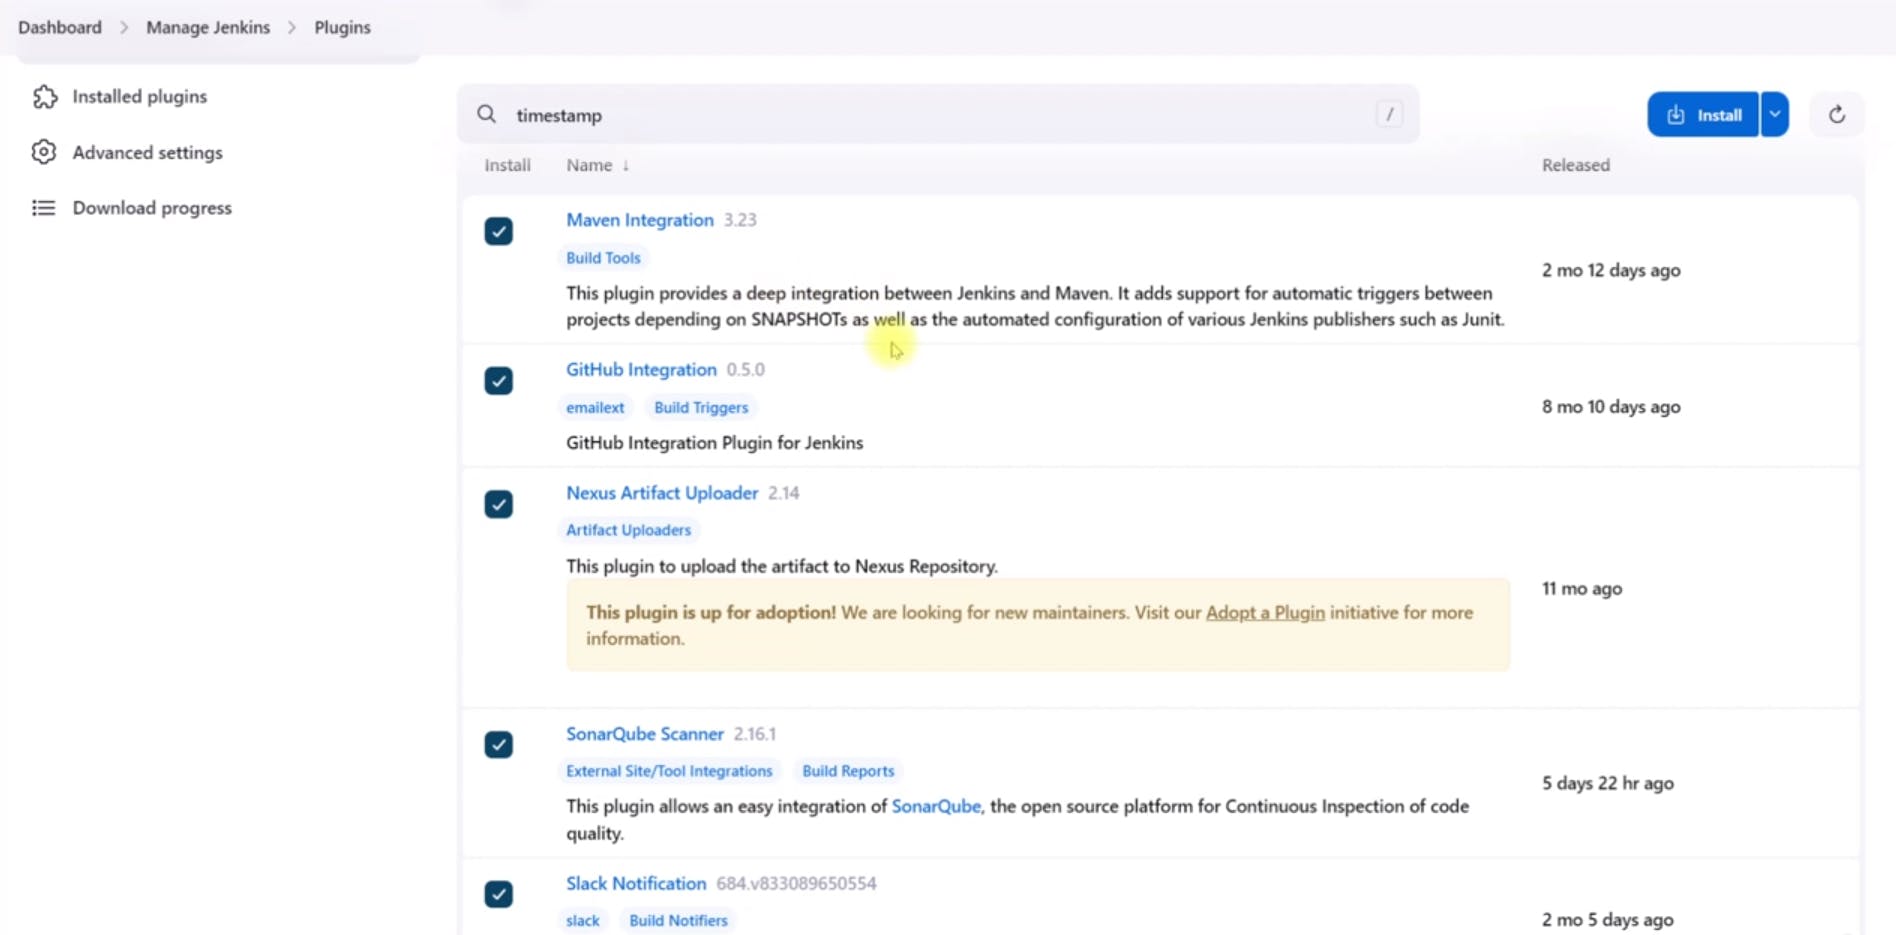
Install necessary plugins for Maven, GitHub integration, Nexus, SonarQube, Slack, and Timestamp.
Nexus Setup:
Access Nexus using the public IP address.
SSH into the Nexus server and check the status of the Nexus service.
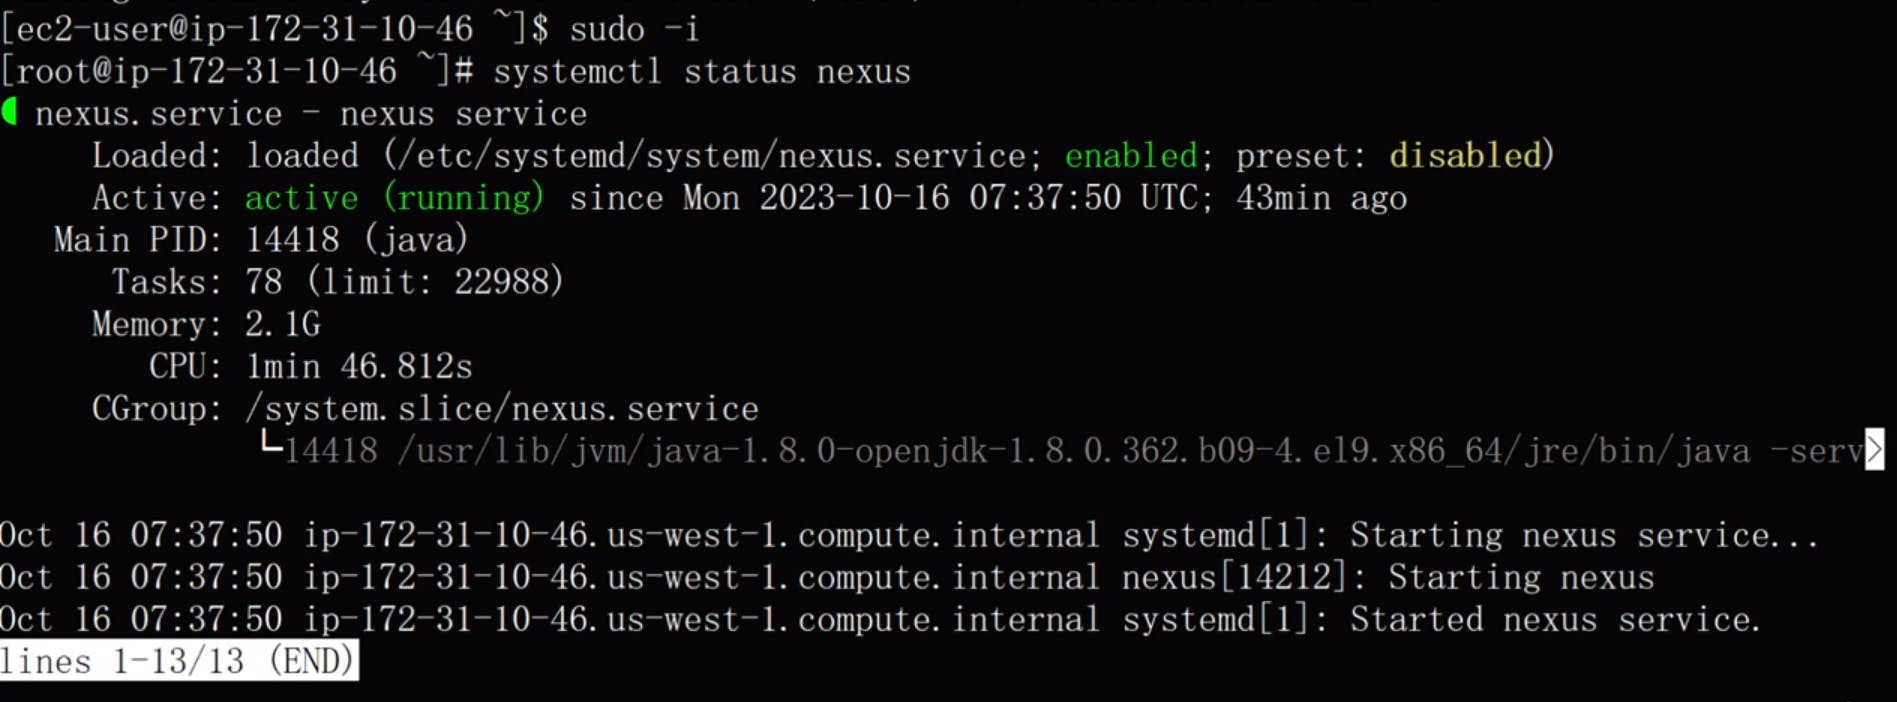
Access Nexus in the browser and complete the initial setup by providing the initial password. Go to
/opt/nexus/sonatype-work/nexus3/admin.password
Create repositories for hosting artifacts and proxying Maven dependencies.
maven(hosted)
Name : vprofile-release
maven(proxy) :
Name: vpro-maven-central
Under Remote Storage , Enter the URL :
https://repo1.maven.org/maven2/
macen(hosted) :
Name: vprofile-snapshot
Under Version Policy , Select Snapshot
maven(group):
Name: vpro-maven-group
Set up a group repository to group all the created repositories together.

SonarQube Setup:
Access SonarQube using the public IP address.
SSH into the SonarQube server and check the status of the SonarQube service.
Access SonarQube in the browser and log in using the default credentials (admin/admin).

Git Code Migration:
Forking the Repository:
Access GitHub:
Log in to your GitHub account.
Open the URL of the repository you want to fork.
Click on the "Fork" button to create a fork of the repository in your GitHub account.
Setting Up Git Configurations:
Global Username and Email:
Use
git config --globaluser.email"your-email@example.com"to set your global email address.Use
git config --globaluser.name"Your Name"to set your global username.
Generating SSH Keys:
Generate SSH Keys:
Use
ssh-keygencommand to generate SSH keys.Press Enter for passphrase to not use any passphrase.
Adding SSH Keys to GitHub:
Copy and Add SSH Keys:
Use
cat ~/.ssh/id_rsa.pubto display your public key.Copy the content of the public key.
Go to your GitHub account settings.
Navigate to "SSH and GPG keys" section.
Click on "New SSH key" and paste the copied public key.
Add a title and click on "Add SSH key".
Cloning the Forked Repository using VS Code:
Clone the Repository:
Open Visual Studio Code.
Go to Source Control view.
Click on "Clone Repository". https://github.com/devopshydclub/vprofile-project.git
Paste the repository URL and select the destination folder.
Confirm the cloning process.
Making Changes and Pushing to GitHub:
Make Changes:
Open the cloned repository in VS Code.
Make changes to files as needed.
Save the changes.
Commit and Push:
Go to Source Control view in VS Code.
Commit the changes with a message.
Push the changes to your GitHub repository.
Switch Branches (if necessary):
- Ensure that you are working on the correct branch (e.g.,
CI-Jenkinsbranch).
- Ensure that you are working on the correct branch (e.g.,
Setting up Jenkins pipelines, adding tools like Maven and JDK, managing credentials, and writing pipeline scripts
Adding Tools in Jenkins:
Access Jenkins:
Navigate to Jenkins and log in to your account.
Go to "Manage Jenkins" > "Global Tool Configuration."
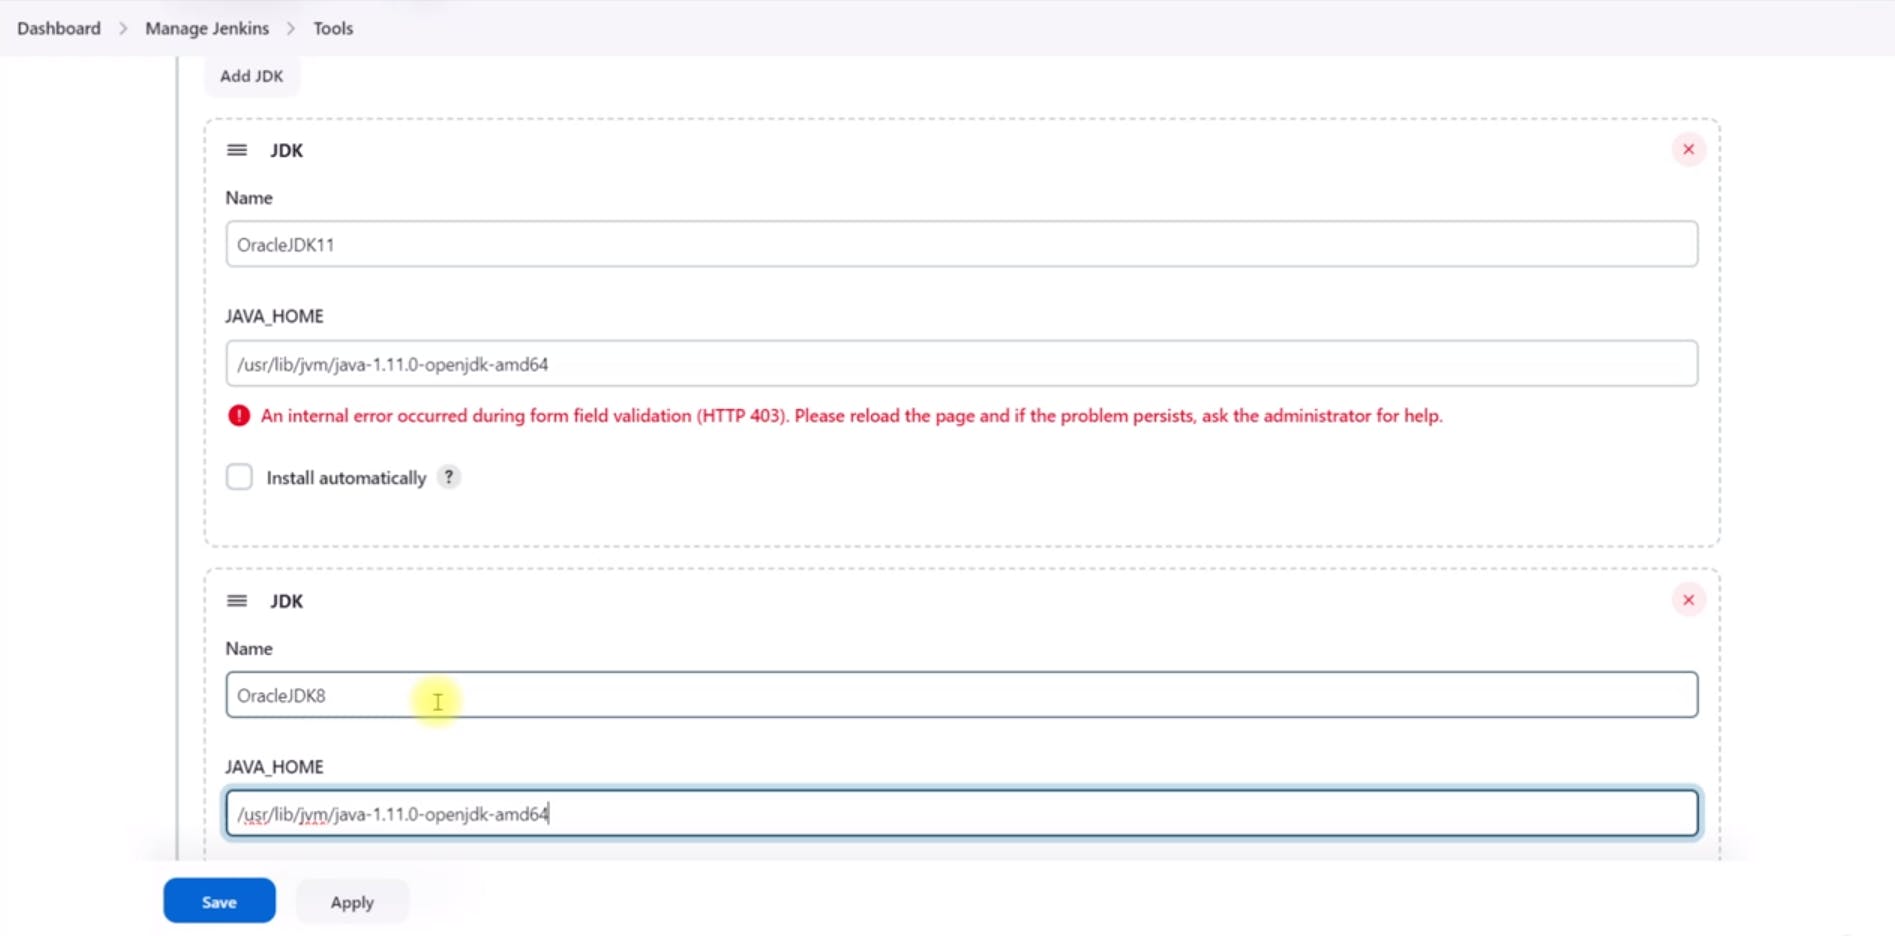
Add JDK:
Click on "JDK installations."
Add JDK 8 and JDK 11 installations manually by specifying the path to their installations.
Add Maven:
Click on "Maven installations."
Add Maven 3.9.5 or your preferred version.

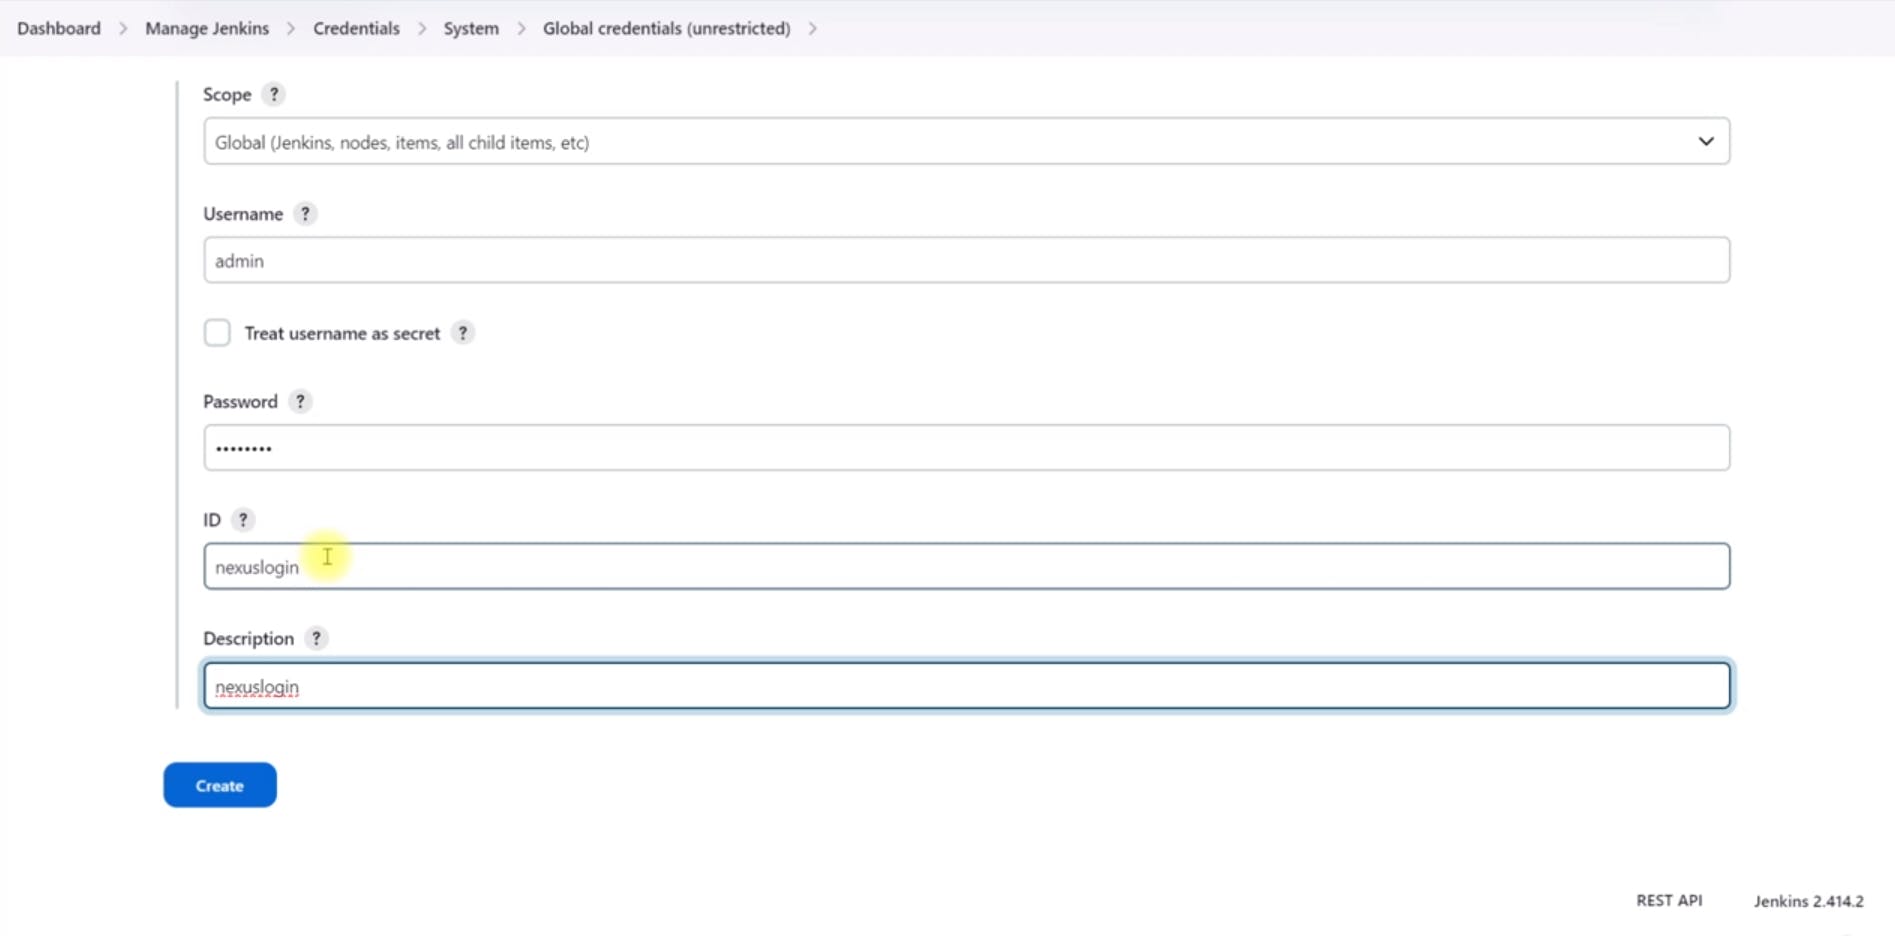
Managing Credentials in Jenkins:
Add Nexus Credentials:
Go to "Credentials" > "System" > "Global credentials."
Click on "Add credentials" and select "Username with password."
Enter the Nexus username and password.
Store GitHub SSH Key:
Switch to the Jenkins user on your server.
Use the
ssh-keyscancommand to store the GitHub identity.
Writing Jenkins Pipeline Script:
Create a New Jenkins Job:
Click on "New item" and select "Pipeline."
Provide a name for your pipeline job and select the "Pipeline script from SCM" option.
Enter your GitHub repository URL and credentials.
Define Pipeline Script:
Write a Jenkinsfile in your repository. ( Note: Jenkins File is Already in the Github Repo
Use the
pipelineblock to define the stages and steps.Specify the tools to be used (e.g., Maven, JDK) within the
toolsblock.Define environment variables for Nexus repository details and credentials.
Configure the pipeline stages, such as checkout, build, and deployment.
  pipeline {
      agent any
      tools {
          maven "MAVEN3"
          jdk "OracleJDK8"
      }
      environment {
          SNAP_REPO = 'vprofile-snapshot'
          NEXUS_USER = 'admin'
          NEXUS_PASS = 'admin123'
          RELEASE_REPO = 'vprofile-release'
          CENTRAL_REPO = 'vpro-maven-central'
          NEXUSIP = 'Private_IP_of_Nexus_Server'
          NEXUSPORT = '8081'
          NEXUS_GRP_REPO = 'vpro-maven-group'
          NEXUS_LOGIN = 'nexuslogin'

      }
      stages {
          stage('Build'){
              steps {
                  sh 'mvn -s settings.xml -DskipTests install'
              }
          }
      }
  }
Save and commit your changes to the Jenkinsfile in your Git repository.
Ensure that the Jenkinsfile is in the correct branch (e.g.,
CI-Jenkins).
Test the Pipeline:
Trigger the pipeline job in Jenkins and observe the build process.
Monitor the console output for any errors or successful completion.
Creating a New Jenkins Job:
Access Jenkins and click on "New Item" to create a new job.
Give the job a name, such as "Profile CI Pipeline."
Select the "Pipeline" option and click "OK."
Configuring Pipeline Script:
In the pipeline configuration, select "Pipeline script from SCM."
Choose Git as the SCM (Source Code Management) option.
Provide the repository URL of your GitHub repository.
Adding Credentials:
Click on the "Add" button to add credentials for accessing your GitHub repository.
Choose "Jenkins" as the kind of credential.
Use SSH username with private key authentication.
Provide a description for the credential, such as "GitHub login username."
Paste the private key associated with your GitHub account.
Storing GitHub Identity:

SSH into the Jenkins server using its public IP address.
Switch to the root user and then switch to the Jenkins user.
Run the SSH command to establish the identity of your GitHub account and accept it.
Configuring Branches:
Ensure that you specify the correct branch name (e.g.,
CI-Jenkins) where your Jenkinsfile is located.This is crucial for Jenkins to fetch the correct pipeline script from your repository.
Automating Pipeline Triggers:
Configuring GitHub Webhook:
Ensure that the Jenkins Security Group allows port 88 from any IPv4 and IPv6 address.
Copy the URL of your Jenkins instance.
Go to your GitHub repository settings and navigate to the webhooks section.
Add a new webhook, paste the Jenkins URL followed by
/github-webhook/, and ensure there's a forward slash at the end.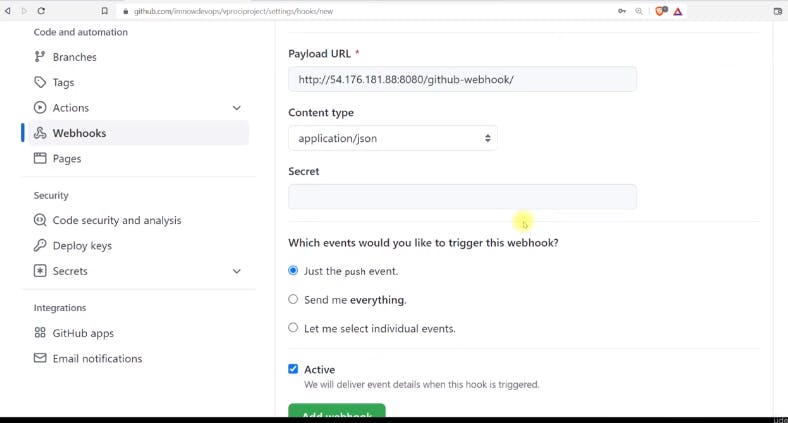
Set the content type to JSON and select the events that should trigger the webhook (e.g., push events).
Test the webhook to ensure it's working correctly.
Enabling GitHub Hook Trigger in Jenkins:
In your Jenkins job configuration, enable the "GitHub hook trigger for GITScm polling" option.
This allows Jenkins to be triggered automatically whenever a push event occurs in the GitHub repository.
Adding Post-Build Actions:
Modify your Jenkinsfile to include post-build actions.
These actions can include archiving artifacts generated during the build process and running additional tests or code analysis tools.
For example, you mentioned archiving artifacts with the
archiveArtifactsplugin and running unit tests and code analysis with Maven commands.```plaintext pipeline { agent any tools { maven "MAVEN3" jdk "OracleJDK8" } environment { SNAP_REPO = 'vprofile-snapshot' NEXUS_USER = 'admin' NEXUS_PASS = 'admin123' RELEASE_REPO = 'vprofile-release' CENTRAL_REPO = 'vpro-maven-central' NEXUSIP = 'Private_IP_of_Nexus_Server' NEXUSPORT = '8081' NEXUS_GRP_REPO = 'vpro-maven-group' NEXUS_LOGIN = 'nexuslogin' SONARSERVER = 'sonarserver' SONARSCANNER = 'sonarscanner'
}
stages { stage('Build'){ steps { sh 'mvn -s settings.xml -DskipTests install' } post { success { echo "Now archiving the artifacts" archiveArtifacts artifacts: '*/.war' } } } stage('Test'){ steps { sh 'mvn -s settings.xml test' } } stage('Checkstyle Analysis'){ steps { sh 'mvn -s settings.xml checkstyle:checkstyle' } } } }
* Make changes to your code, commit, and push them to the GitHub repository.
* The GitHub webhook should automatically trigger the Jenkins pipeline, which will execute the defined stages and steps in your Jenkinsfile.
## Code Analysis with Sonarqube:
1. **Setting up SonarQube Scanner in Jenkins:**
* In Jenkins, you've configured the SonarQube Scanner tool by adding it in the global tool configuration.

* You've also stored the SonarQube server information in Jenkins by providing the SonarQube server URL and authentication token.


2. **Writing SonarQube Analysis Stage in Jenkins Pipeline:**
* In your Jenkins pipeline script, you've defined a new stage called "Sonar Analysis" where you'll perform the SonarQube analysis.
* You've defined environment variables for the SonarQube server and SonarQube scanner tool names.
* Within the "Sonar Analysis" stage, you've used the SonarQube Scanner tool to analyze the code.
* You've provided various parameters to the SonarQube Scanner tool, such as project key, project name, source code directory, and paths to different reports generated during the build process.
```plaintext
pipeline {
agent any
tools {
maven "MAVEN3"
jdk "OracleJDK8"
}
environment {
SNAP_REPO = 'vprofile-snapshot'
NEXUS_USER = 'admin'
NEXUS_PASS = 'admin123'
RELEASE_REPO = 'vprofile-release'
CENTRAL_REPO = 'vpro-maven-central'
NEXUSIP = 'Private_IP_of_Nexus_Server'
NEXUSPORT = '8081'
NEXUS_GRP_REPO = 'vpro-maven-group'
NEXUS_LOGIN = 'nexuslogin'
SONARSERVER = 'sonarserver'
SONARSCANNER = 'sonarscanner'
}
stages {
stage('Build'){
steps {
sh 'mvn -s settings.xml -DskipTests install'
}
post {
success {
echo "Now archiving the artifacts"
archiveArtifacts artifacts: '**/*.war'
}
}
}
stage('Test'){
steps {
sh 'mvn -s settings.xml test'
}
}
stage('Checkstyle Analysis'){
steps {
sh 'mvn -s settings.xml checkstyle:checkstyle'
}
}
stage('Sonar Analysis'){
environment {
scannerHome = tool "${SONARSCANNER}"
}
steps {
withSonarQubeEnv('sonarserver') {
sh '''${scannerHome}/bin/sonar-scanner -Dsonar.projectKey=vprofile \
-Dsonar.projectName=vprofile \
-Dsonar.projectVersion=1.0 \
-Dsonar.sources=src/ \
-Dsonar.java.binaries=target/test-classes/com/visualpathit/account/controllerTest/ \
-Dsonar.junit.reportsPath=target/surefire-reports/ \
-Dsonar.jacoco.reportsPath=target/jacoco.exec \
-Dsonar.java.checkstyle.reportPaths=target/checkstyle-result.xml'''
}
}
}
}
}
Testing the Pipeline:
- After committing and pushing your changes, Jenkins automatically triggered the pipeline.
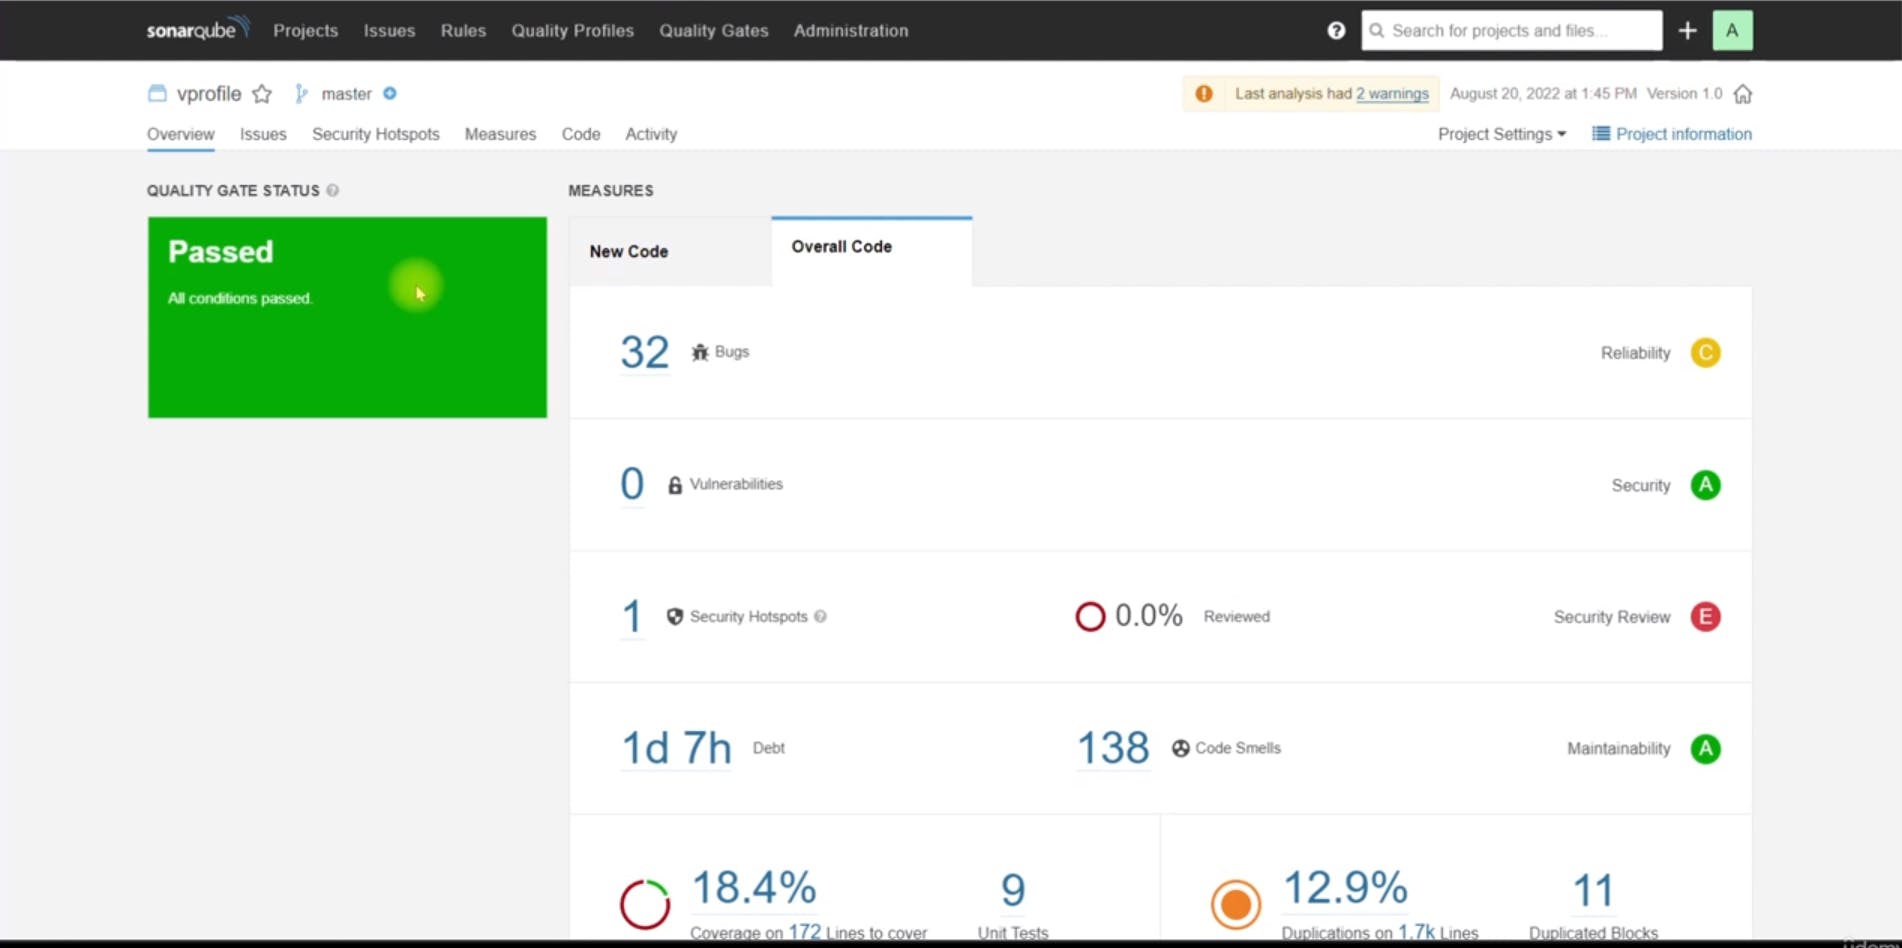
Sonar Quality Gates:
The SonarQube analysis stage successfully uploaded the analysis results to the SonarQube server.

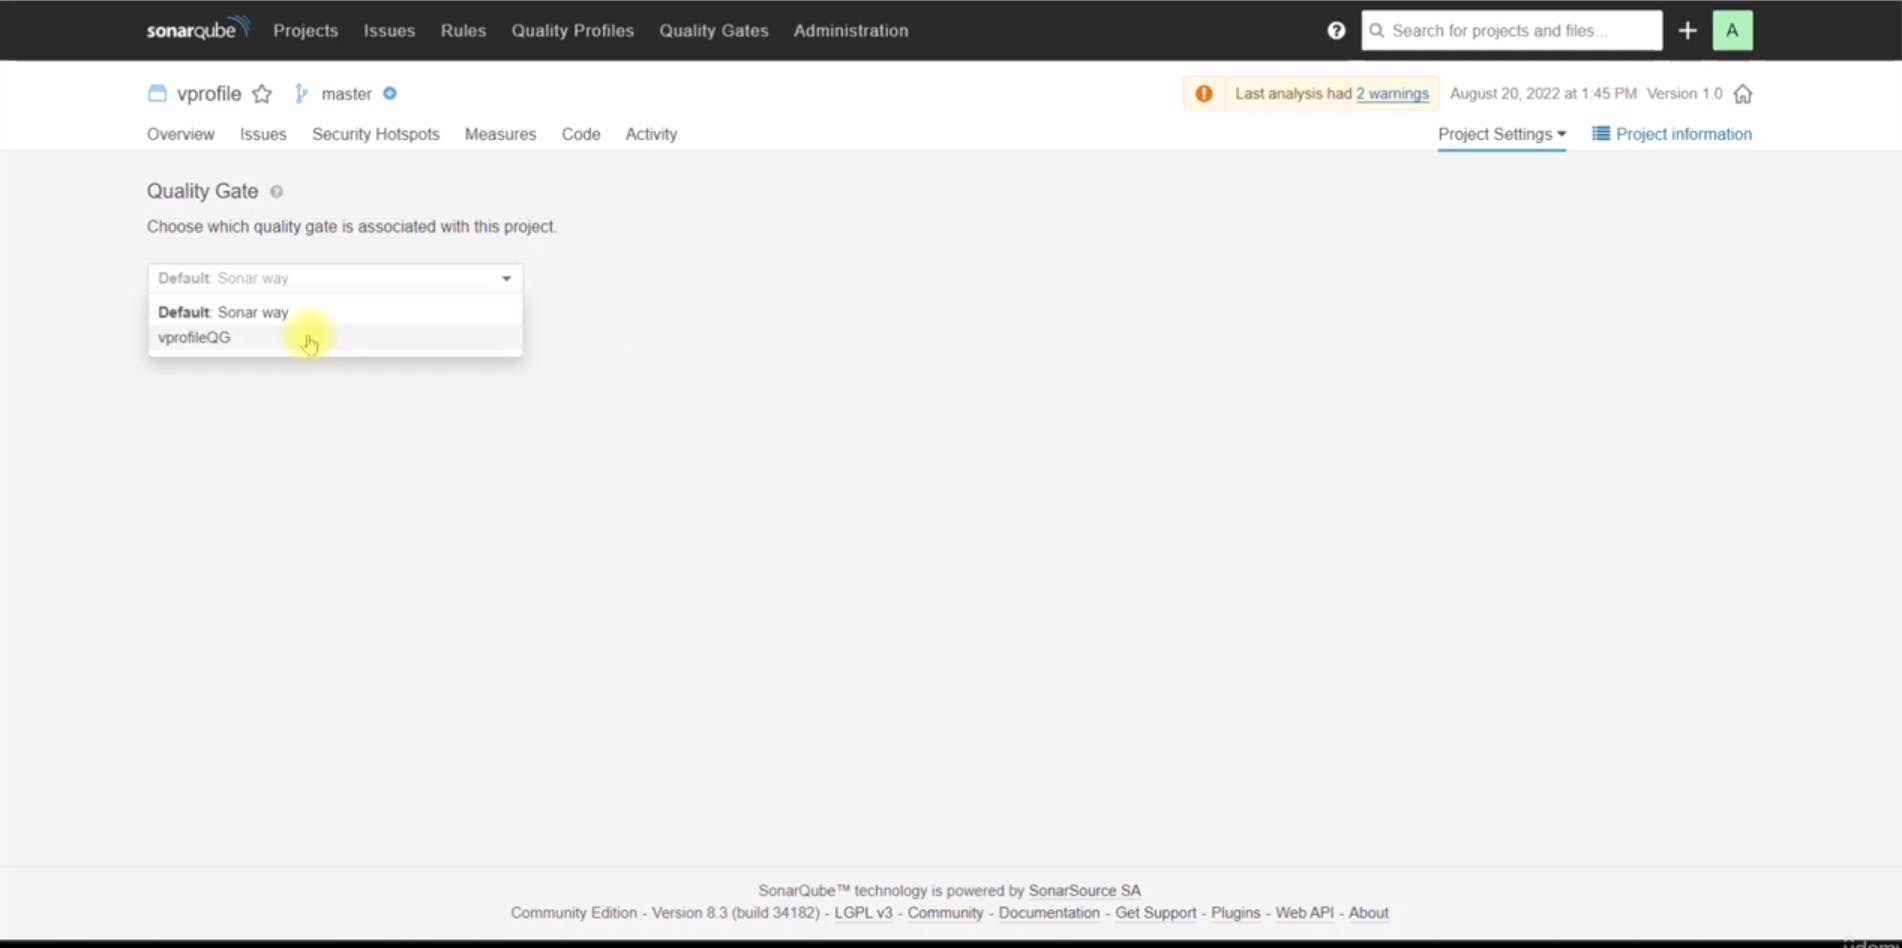
Creating a Quality Gate in SonarQube:
Accessed the project settings in SonarQube , Under the Quality Gates

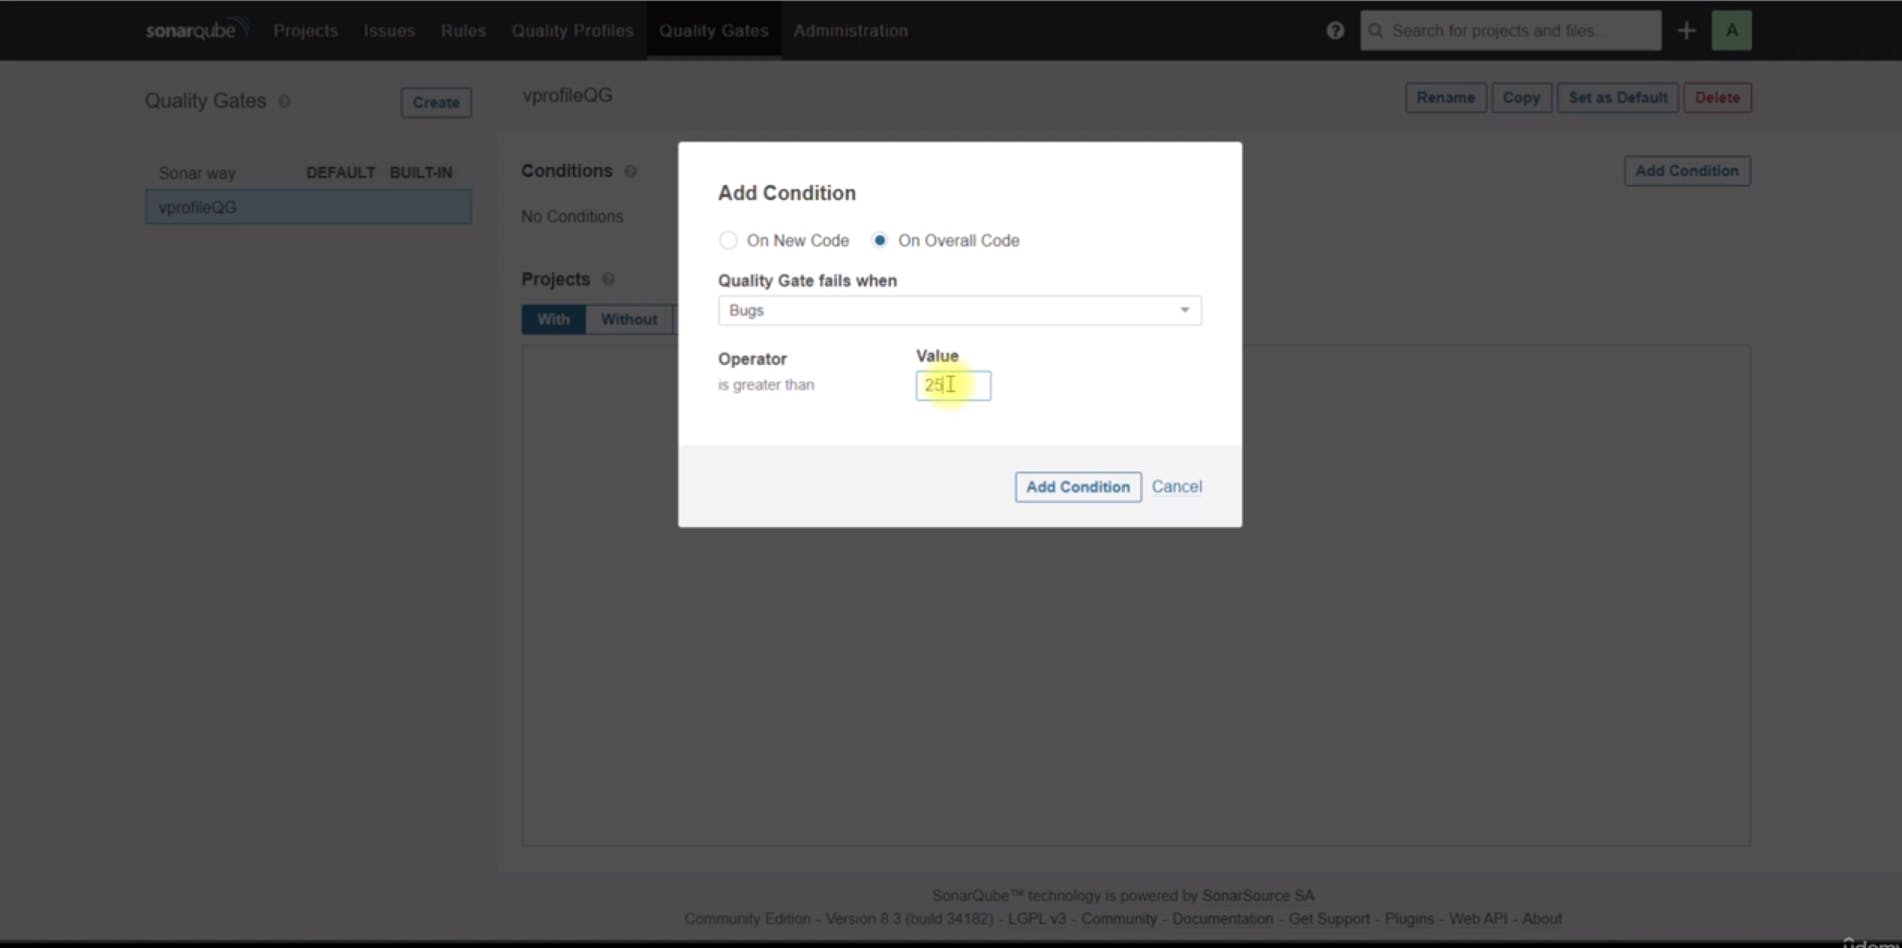
Create a new quality gate named "vprofileOG" with a rule that specifies the
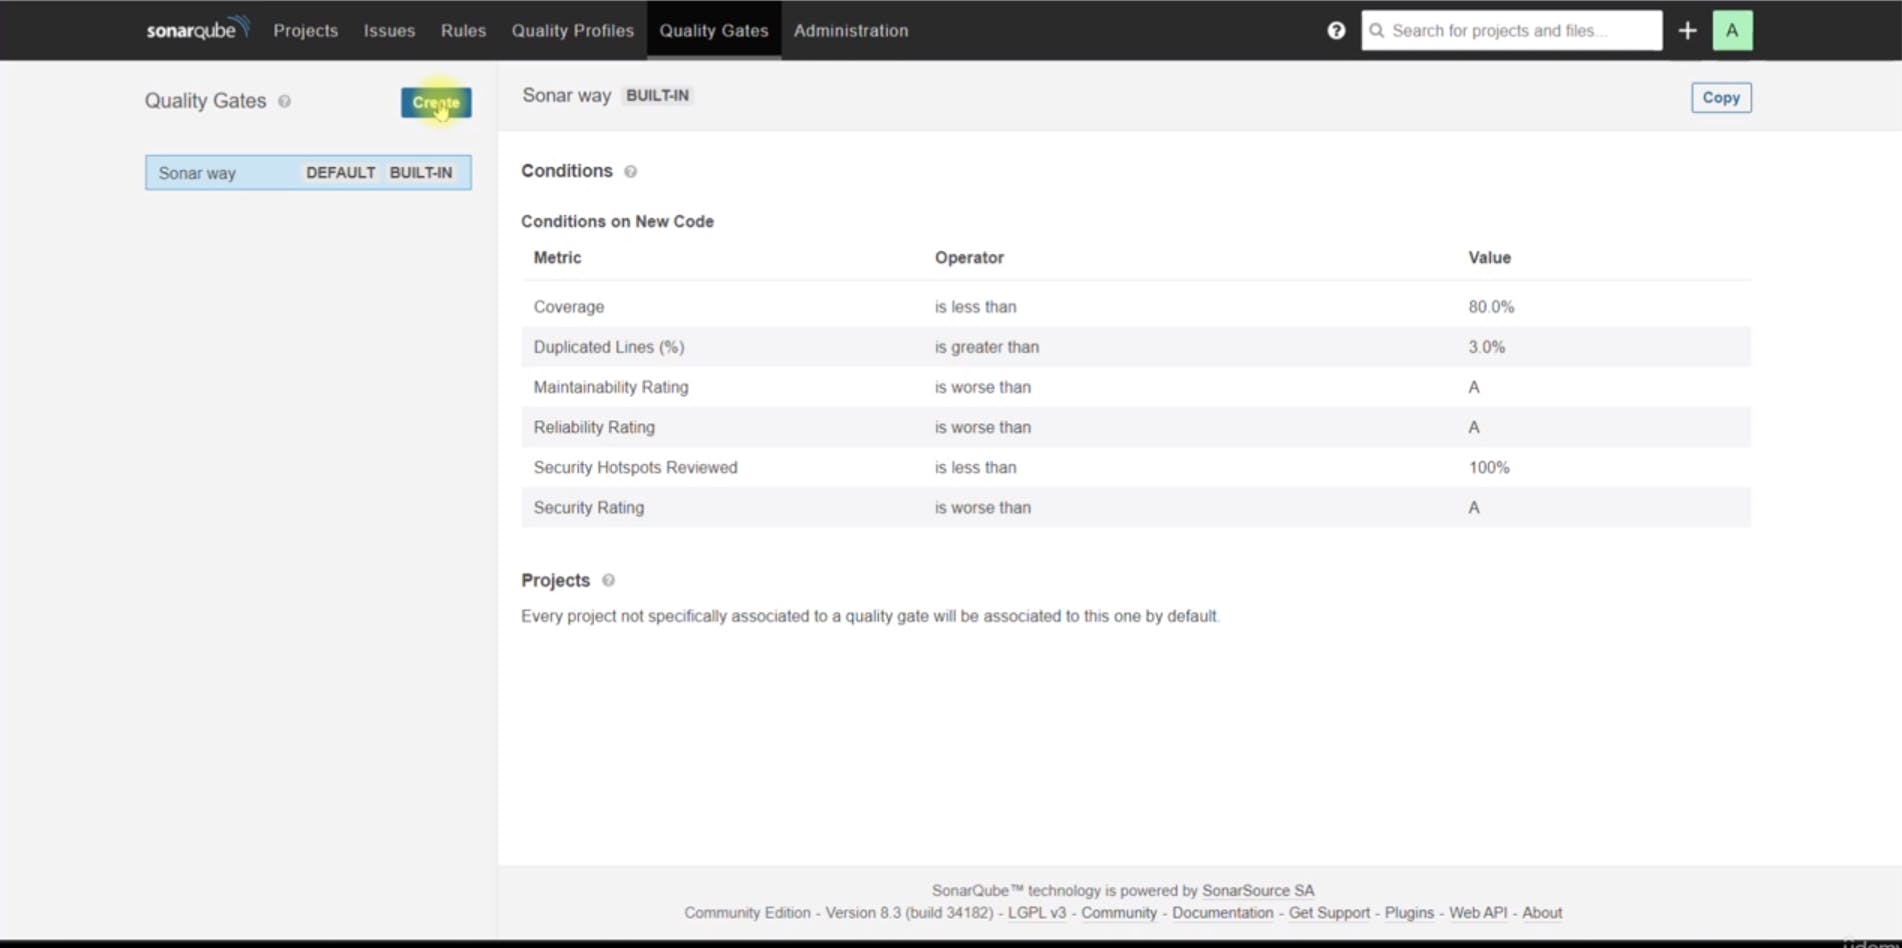
number of bugs should be greater than 25 for the quality gate to fail.
Attaching the Quality Gate to the Project:
After creating the quality gate, you attached it to your project so that it would be applied during the analysis process.
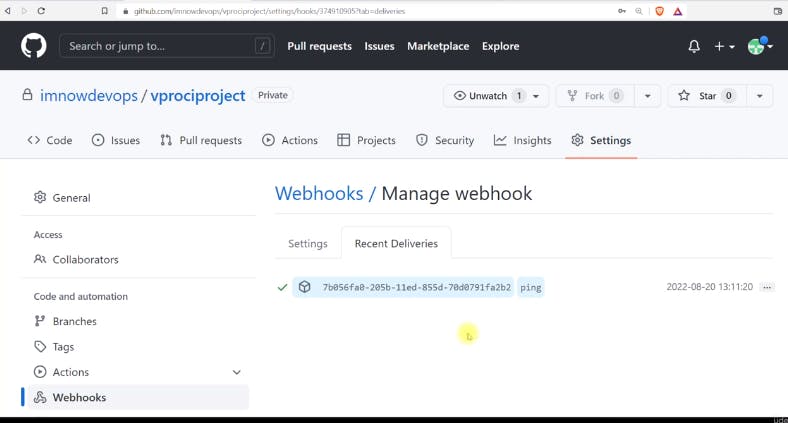
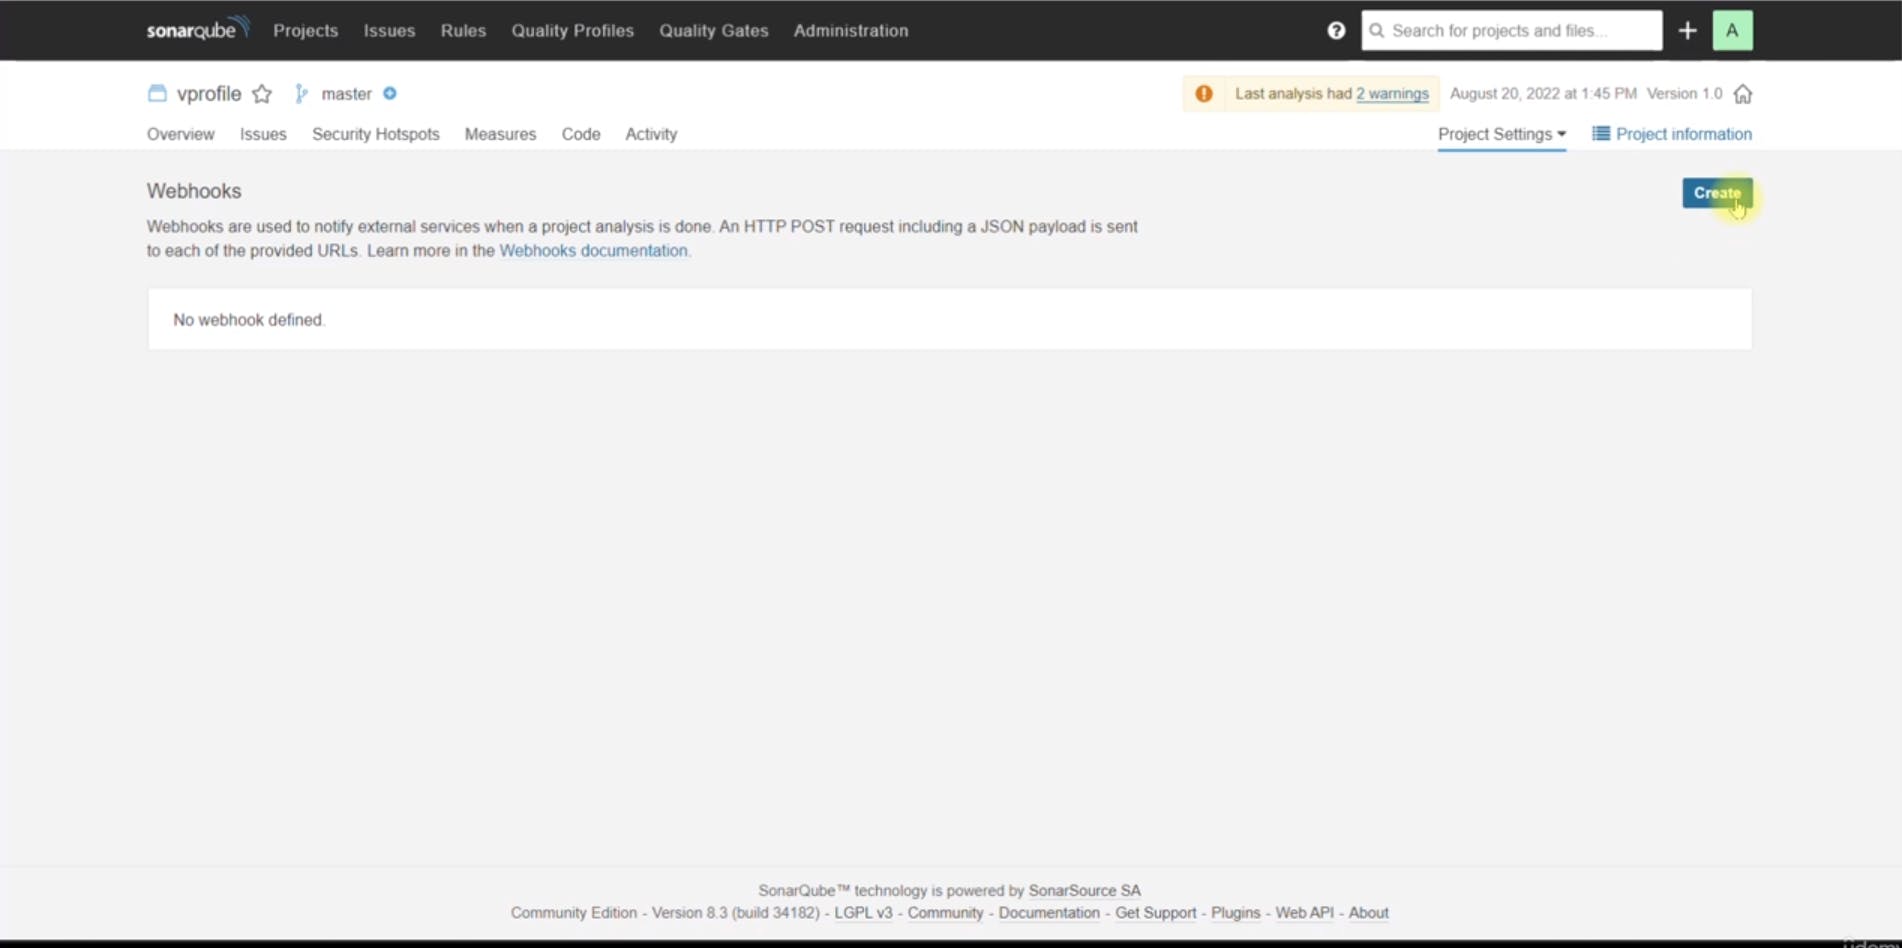
Configuring SonarQube Webhook for Jenkins:
You configured a webhook in SonarQube to send the analysis result to Jenkins. This allows Jenkins to wait for the quality gate result and determine whether the pipeline should pass or fail based on the quality gate conditions.
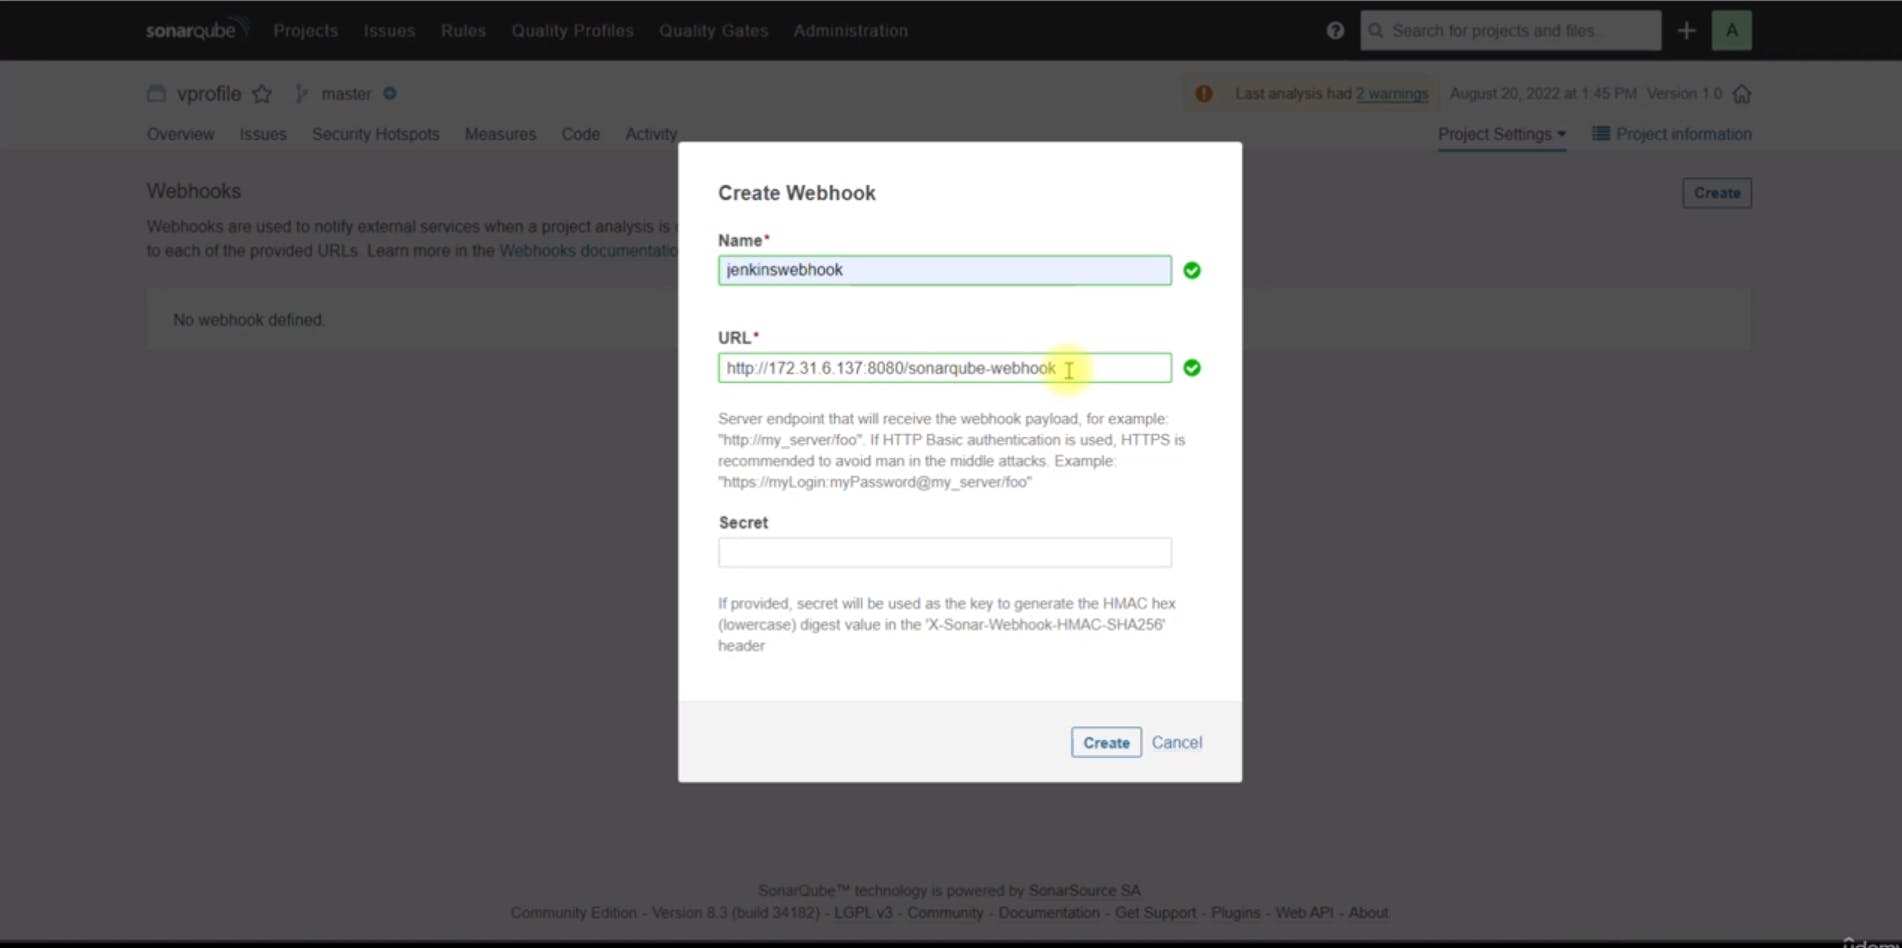
Make Sure the IP is Jenkins Server's Private IP.
Implementing Quality Gate Check in Jenkins Pipeline:
In your Jenkins pipeline script, you added a new stage called "Quality Gate" that waits for the quality gate result from SonarQube.
You configured the stage to time out after one hour if it doesn't receive a response from SonarQube.
The pipeline now aborts if the quality gate fails, indicating that the project's code quality does not meet the specified criteria.
```plaintext pipeline { agent any tools { maven "MAVEN3" jdk "OracleJDK8" } environment { SNAP_REPO = 'vprofile-snapshot' NEXUS_USER = 'admin' NEXUS_PASS = 'admin123' RELEASE_REPO = 'vprofile-release' CENTRAL_REPO = 'vpro-maven-central' NEXUSIP = 'Private_IP_of_Nexus_Server' NEXUSPORT = '8081' NEXUS_GRP_REPO = 'vpro-maven-group' NEXUS_LOGIN = 'nexuslogin' SONARSERVER = 'sonarserver' SONARSCANNER = 'sonarscanner'
}
stages { stage('Build'){ steps { sh 'mvn -s settings.xml -DskipTests install' } post { success { echo "Now archiving the artifacts" archiveArtifacts artifacts: '*/.war' } } } stage('Test'){ steps { sh 'mvn -s settings.xml test' } } stage('Checkstyle Analysis'){ steps { sh 'mvn -s settings.xml checkstyle:checkstyle' } } stage('Sonar Analysis'){ environment { scannerHome = tool "${SONARSCANNER}" } steps { withSonarQubeEnv('sonarserver') { sh '''${scannerHome}/bin/sonar-scanner -Dsonar.projectKey=vprofile \ -Dsonar.projectName=vprofile \ -Dsonar.projectVersion=1.0 \ -Dsonar.sources=src/ \ -Dsonar.java.binaries=target/test-classes/com/visualpathit/account/controllerTest/ \ -Dsonar.junit.reportsPath=target/surefire-reports/ \ -Dsonar.jacoco.reportsPath=target/jacoco.exec \ -Dsonar.java.checkstyle.reportPaths=target/checkstyle-result.xml''' }
} } stage('QualityGate'){ steps { timeout(time: 1, unit: 'HOURS') { waitForQualityGate abortPipeline: true } } } } }
5. **Testing the Pipeline with Quality Gates:**
* You tested the pipeline by intentionally setting the quality gate conditions to fail (bugs greater than 25), and observed that the pipeline failed as expected due to the quality gate failure.

* After adjusting the quality gate conditions to pass (bugs less than 100), you ran the pipeline again and observed that it passed successfully since the quality gate conditions were met.
## Publish Artifact to Nexus Repository:
1. **Configuring the Build Timestamp Plugin:**

* Configured the Build Timestamp plugin in Jenkins to generate a timestamp for versioning artifacts. This ensures that each artifact uploaded to the Nexus repository has a unique version identifier based on the build timestamp.
2. **Finding Documentation for the Nexus Artifact Uploader Plugin and Implementing the Artifact Upload Stage::**
```plaintext
pipeline {
agent any
tools {
maven "MAVEN3"
jdk "OracleJDK8"
}
environment {
SNAP_REPO = 'vprofile-snapshot'
NEXUS_USER = 'admin'
NEXUS_PASS = 'admin123'
RELEASE_REPO = 'vprofile-release'
CENTRAL_REPO = 'vpro-maven-central'
NEXUSIP = 'Private_IP_of_Nexus_Server'
NEXUSPORT = '8081'
NEXUS_GRP_REPO = 'vpro-maven-group'
NEXUS_LOGIN = 'nexuslogin'
SONARSERVER = 'sonarserver'
SONARSCANNER = 'sonarscanner'
}
stages {
stage('Build'){
steps {
sh 'mvn -s settings.xml -DskipTests install'
}
post {
success {
echo "Now archiving the artifacts"
archiveArtifacts artifacts: '**/*.war'
}
}
}
stage('Test'){
steps {
sh 'mvn -s settings.xml test'
}
}
stage('Checkstyle Analysis'){
steps {
sh 'mvn -s settings.xml checkstyle:checkstyle'
}
}
stage('Sonar Analysis'){
environment {
scannerHome = tool "${SONARSCANNER}"
}
steps {
withSonarQubeEnv('sonarserver') {
sh '''${scannerHome}/bin/sonar-scanner -Dsonar.projectKey=vprofile \
-Dsonar.projectName=vprofile \
-Dsonar.projectVersion=1.0 \
-Dsonar.sources=src/ \
-Dsonar.java.binaries=target/test-classes/com/visualpathit/account/controllerTest/ \
-Dsonar.junit.reportsPath=target/surefire-reports/ \
-Dsonar.jacoco.reportsPath=target/jacoco.exec \
-Dsonar.java.checkstyle.reportPaths=target/checkstyle-result.xml'''
}
}
}
stage('QualityGate'){
steps {
timeout(time: 1, unit: 'HOURS') {
waitForQualityGate abortPipeline: true
}
}
}
stage("UploadArtifact"){
steps{
nexusArtifactUploader(
nexusVersion: 'nexus3',
protocol: 'http',
nexusUrl: "${NEXUSIP}:${NEXUSPORT}",
groupId: 'QA',
version: "${env.BUILD_ID}-${env.BUILD_TIMESTAMP}",
repository: "${RELEASE_REPO}",
credentialsId: "${NEXUS_LOGIN}",
artifacts: [
[artifactId: 'vproapp',
classifier: '',
file: 'target/vprofile-v2.war',
type: 'war']
]
)
}
}
}
}
Search for documentation on how to upload artifacts to Nexus using Jenkins Pipeline and found the relevant documentation on GitHub for the Nexus Artifact Uploader Plugin.
Add a new stage in your Jenkins pipeline named "Upload Artifact" where you included the necessary code to upload artifacts to the Nexus repository.
Inside the stage, you specified details such as Nexus URL, repository information, artifact ID, file path, and authentication credentials.
The plugin automatically handles the versioning of artifacts using the build ID and timestamp, ensuring that each artifact has a unique identifier.
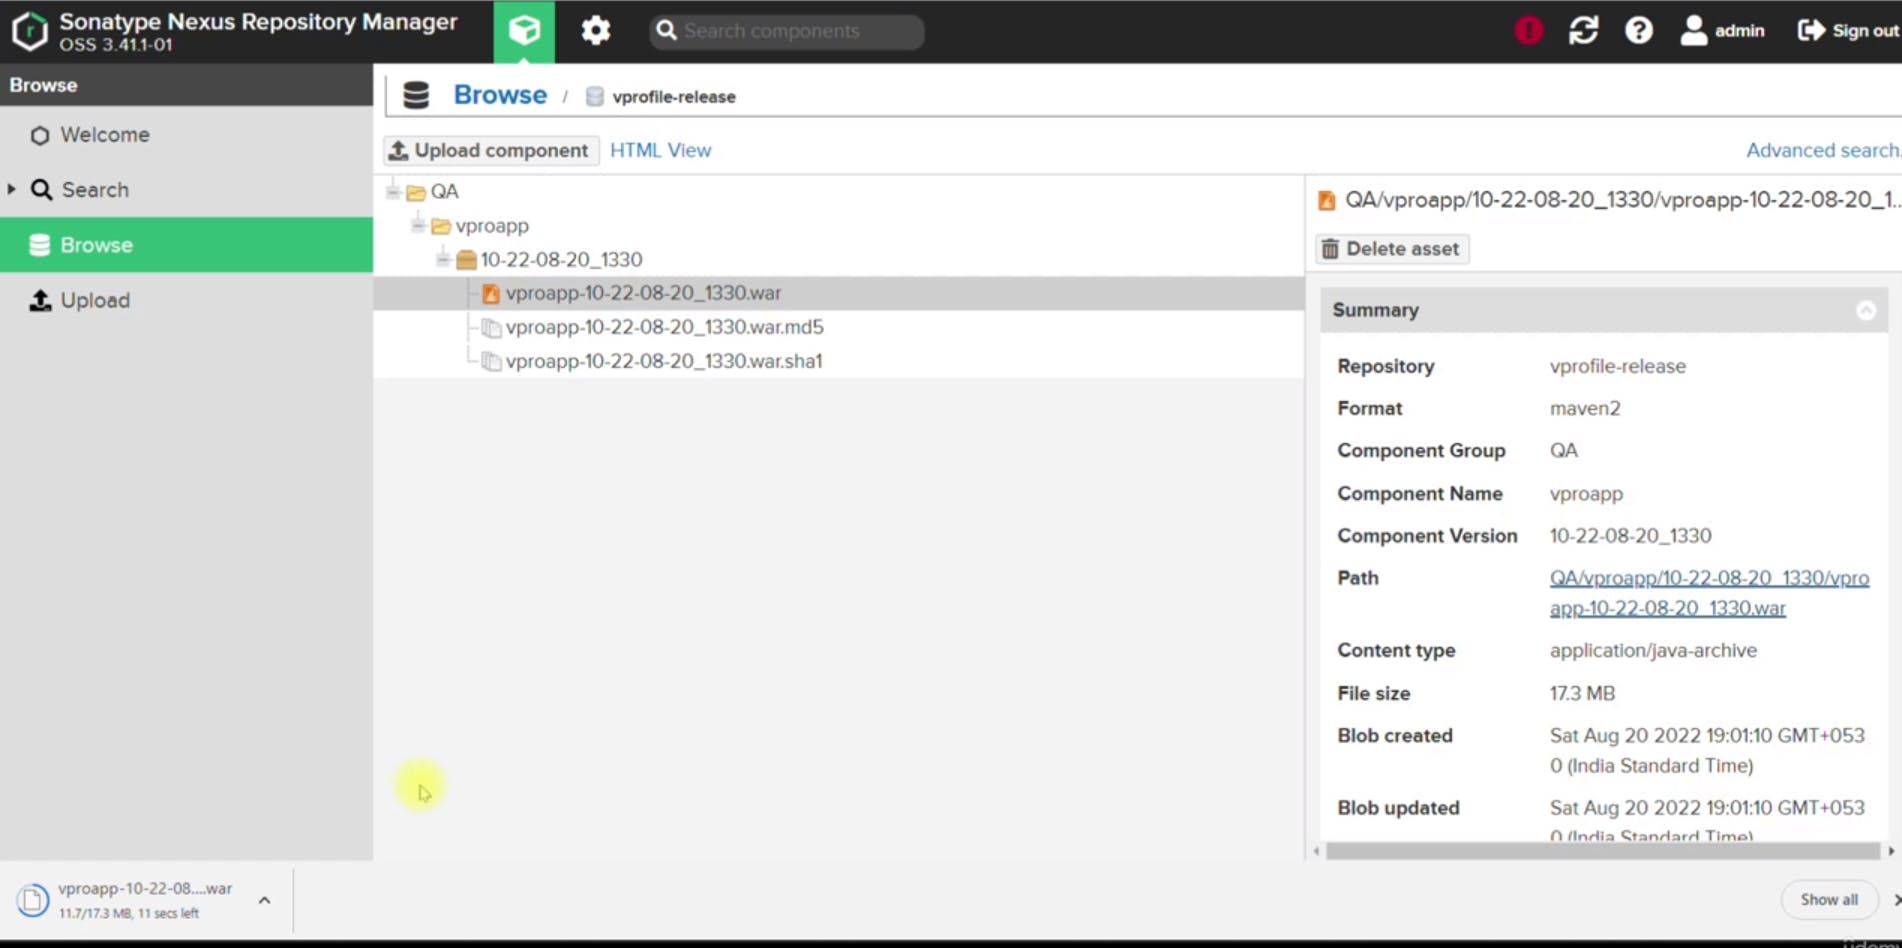
Testing the Pipeline:
After making adjustments to your pipeline script, you tested the pipeline by triggering a build and observed the artifact upload process.
Verify that artifacts were successfully uploaded to the Nexus repository with unique version identifiers based on the build timestamp.
Slack Notification:
Setting Up Slack Integration:
You created a Slack workspace and channel specifically for Jenkins notifications.
Installed the Jenkins app in Slack and obtained the required token for integration.
Configured Jenkins with the Slack plugin by providing the workspace, token, and channel details.
Adding Slack Notification Stage to Pipeline:
Added a post-build step in your Jenkins pipeline to send notifications to the Slack channel.
Used the Slack plugin to send messages with dynamic color coding based on the build result (success or failure).
Constructed a message template that includes information such as build result, job name, build number, and build URL.
Testing and Validation:
Tested the pipeline by triggering builds and observing the notifications in the Slack channel.
Verified that successful and failed builds are appropriately distinguished with green and red colors, respectively.
Ensured that the message includes relevant details for easy troubleshooting and follow-up actions.
Cleanup and Maintenance:
- Provided instructions for managing resources, including shutting down instances to avoid charges and potential cleanup if needed.